Thursday, 28 April 2011

Love Fabric Skirt

After my first failed attempt at doing bound buttonholes on my jacket, I decided to put it aside and wait a couple of days before I tried again. After all I only had enough fabric for one more try! I had fabric cut for a vintage shirt from Simplicity 4255 but was wanting something quick and simple.
One of the projects on my sewing list, using existing fabric and haberdashery supplies was a simple skirt following Vogue Easy Options 8295. It was so easy to put together I can't really say much about it. I made it in time to enjoy the nice Easter weekend weather we had here in the UK.

A couple of photos with the true colours.
And a few with a washed out effect I quite like (I wanted to post all like this but thought it would be nice for you to see some with "the real colours").

Cheers!
Lastly a inside shoot (to keep me on my toes ;)!

Monday, 25 April 2011

RTW Tailoring Sew Along - Bound Buttonholes

Following my buttonhole nightmare with Vogue 8604 I decide to learn how to do bound buttonholes and use them for my jacket.  I followed Tasia from Sewaholic tutorial and was pleasantly surprised to find out how easy they were. Sherry and Gertie also have brilliant tutorials. In fact it is dead easy when you doing isolated bound buttonholes, but when you need to do five, perfectly lined up the story is completely different.
I thought I had marked the placement lines carefully:
But somehow along the line, I ended up with two different buttonholes, so wonky that the only way to cover would be to get huge buttons. I was frustrated and only managed a lousy photo on my phone to share with my twitter followers.
CarmencitaB came to my rescue (as she always does, thank you!) and shared this link (from a blog that I now follow), which shows more complex bound buttonhole marking techniques. I didn't follow it by the letter but took what I needed which was mark, mark, mark!! I can only hope all those markings will disappear easily. I also basted all buttonhole lips before I started poking holes, to make sure they all aligned.
And the results were much better!
I have attached the outer jacket shell (minus sleeves) and inserted the fake flap pockets. Sherry shared a tutorial for jet pockets and I was determined to try them. But I confess, poking more holes in this jacket made me nervous so I stuck with the fake ones!

Sunday, 24 April 2011

Vintage Knitting Gorgeousness - A book review

Now this is why I took on knitting and I'm not giving up!

These are just some of the knitting patterns on the gorgeous book "A Stitch in Time - Vintage Knitting and Crochet Patterns 1920-1949: Volume 1" . Aren't these gorgeous? The book consists of knitting patterns adapted to the modern knitter (current yarns, techniques, etc) but it also includes the original pattern with gorgeous vintage images.
I love sewing but I also love knitwear, and one of my biggest frustrations is not finding any knitwear in shops that I truly like. I dabbled before but it was this book that made me decide to take on knitting and persevering with it. I am already preparing to start one lovely cardigan from this book with a easy stitch pattern. I think many of these will be an awesome addition to my self made wardrobe, don't you think?
Volume 2 is coming out soon and I already pre-ordered!

All images are copyrighted to Arbour House Publishing.

Tuesday, 19 April 2011

The Interfacing Tale - RTW Tailoring Sew Along

I have certainly not forgotten this brilliant sew along and now that I can be sure to have a dress to wear for the wedding in a couple of weeks time, it's time to tackle my summer jacket. It's not a standard tailored look so not all posts by the brilliant Sherry will apply but I'm learning lots nonetheless and definitely bookmarking posts for the future.
One of the brilliant things I have learned is blockfusing. After reading about it I thought: "Oh my, it's so simple but it makes perfect sense. Why haven't I thought of it". There's beauty in the simplest of things! Unfortunately for me, I couldn't do this with my jacket. Because I knew I would be busy with My Sabrina Dress, I cut the pattern pieces a long time before Sherry posted about blockfusing.
So I've cut and fused all pieces and learned (or relearned) a couple of things on the way. One is about how to buy and store interfacing. I have bought several weights and qualities depending on what patterns ask. I usually buy more than the pattern asks for as I reckon I will end up using it. But (and this is a big but) after I use it I "shove it" on my cabinet with the other interfacings without labelling or marking. Duh! For someone who still can't recognise weights and types of fabric and interfacing just by touch this is a tad silly. So now, everytime I need to interface something I fuse all types on scraps. Pretty silly no?
The second thing that keeps happening (and I keep repeating) is illustrated in the two photos below:
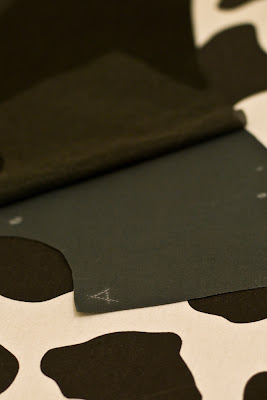
Can you see what happened there? The first photo shows my lovely front piece with accurate markings made using my favourite method, carbon paper and tracing wheel. Seconds later we have a beautifully fused front piece but where the heck are the markings? Gone with the fuse! I end up pinning the pattern tissue again and re-marking. And always forget about it.
I'm interested to hear form you. How do you deal with pattern marking and notches on pieces to be interfaced?

*Apologies for the weird colour in photos. I love sewing at night but I pay the price with lousy photos.

Sunday, 17 April 2011

The accessories for My Sabrina Dress

Thank you very much for all the lovely comments on My Sabrina Dress. They are truly appreciated and I love reading them!

As I probably mentioned before, I will wear My Sabrina Dress at an upcoming friend's wedding. My plan was to do a bolero (in case it gets a bit cold at night), a clutch, a fabric belt and possibly some fabric shoes redo all on the same complementing fabric. My choice was a dark green taffetta.
Bolero:
I have slipstitch lining opening and sleeves this morning. First time working with taffetta and I quite enjoyed it. I used view A of Butterick 3345 and ignored the ruffle. I'm quite pleased with the result but failed at taking a decent sneak pic so you will have to wait till after the weeding to see some photos.
Clutch:
I had plans to make the clutch bag in the same fabric as the bolero but stumbled upon the most gorgeous clutch on ebay and couldn't resist. Isn't it gorgeous?
Fabric Belt:
I have ditched this idea after trying on the dress with the bolero. I think I will make that area too busy (if that makes sense).

Self fabric shoes: Well, I waited too long to experiment with this and have to say taffetta was not the best choice. I decided to do a shopping trawl to see if I could find some nice green shoes but no luck. Blue is in season. Light green and khaki is in season but dark green isn't. I settled for some wedges (I looove wedges) and will try to decorate them with maybe a green bow or flower. Ideas and suggestions on this are more than welcome.

I have sent a request to join the brilliant community blog Sew Retro. Been an avid reader for long and now that I completed a dress out of an original vintage pattern I feel I can belong there.

Sunday, 10 April 2011

My Sabrina Dress - It's finished!

And so I have inserted the zipper and hemmed the skirt and thus I have a finished Sabrina Dress:
The skirt length is not as I initially wanted but it looks ok. I will be wearing this at a friends wedding next May in Hungary and now looking to do matching accessories, including a bolero. I know pink would be a good complimentary colour but I don't like pink that much so settled for a dark green. I will share photos of the full outfit in action then. 
I know I said I would publish a post about waist and seam finishes but life got in the way and I didn't manage to get one ready. I also didn't manage a inside out shoot as this dress doesn't fit Shelly (my dressmakers dummy). Hope you're able to forgive me!
I'm really happy how it turned out and have to say working with a vintage pattern didn't seem to differ from a modern one. At least in this case! The front fits perfectly well and the back is not bad either. It gaps a tiny bit though.

I'll leave you with a twirl!
Pretty twirl was followed by falling flat in the floor. A photo of the fall was taken but I will not share it.

Sunday, 3 April 2011

My Sabrina Dress #6 - Bodice construction

I have made lots of progress on My Sabrina Dress and spent much time and attention getting the bodice right. The front piece has soft pleats which were quite straightforward to sew. I just pinned them down and pressed the lower end to help when taking it to the machine.
 The back is darted and I used my favourite method to do them. Start at the raw edge and when close to tip reduce stitch length. Don't back sew to avoid puckering. When you reach the end raise the presser foot, move the fabric so the needle goes inside the dart and the back sew. You can see a proper explanation of these here. I learned this awesome method through Gertie's Blog For Better Sewing when sewing along the Crepe Wrap Dress.
 I decided to follow pattern instructions and use bias binding to finish facing raw edges. I went for a soft pink just because it doesn't show on the outside. I really do not like wearing a lot of pink. I started by opening the binding and pinning to the edges of the fabric...but...I didn't take in account cloth allowance so the binding didn't wrap around the seam nice and smoothly.
The end result is a bit shoddy, as you can see from photo below but I overlooked it as the front of the facing isn't as bad. (You'll see a inside shot when dress is finished).
When the time came to attach the binding to the armhole facing I took in consideration the cloth allowance and the results are much, much better. I do need to practice sewing bias binding. With my underbust corset the bias is also very poorly sewn.
And voila, the bodice is completed! The end is near and I suspect I will have a whole dress to show you by next weekend. Before that I'll post about waist seams and seam finishes!

LinkWithin

Related Posts Plugin for WordPress, Blogger...